
INSTALL SOUNDSHAPER and CDP
- FULL INSTALLATION: unzip the downloaded zip file Soundshaper_FULL.zip into any folder, e.g. \Downloads.
This includes the latest CDP software, as well as Soundshaper.
- Copy the folder CDPR8 to a location of your choice: the default is C:\CDPR8, but it can be on any drive and you can rename the folder as you wish.
- The CDP programs are in a subfolder called _cdp\_cdprogs
Soundshaper is in a subfolder called \Soundshaper6.
Soundshaper's data files are in a subfolder called \TXT.- Please ensure that the full paths to Soundshaper and to _cdprogs have no spaces.
In general, with Soundshaper and CDP:
- Avoid folder paths with spaces. This is because CDP programs run in a command-line environment, where such spaces may produce errors.
- Use only ASCII characters when naming folders (and possibly also files).
- CDP and Soundshaper do not use the Windows Program Files folder or the Windows Registry.
INSTALLING SOUNDSHAPER UPDATE or UPGRADE
The process is virtually the same as above.
Before downloading:
- Optionally make a copy of your existing datafiles folder (e.g. <CDP-folder>\TXT) so that your own datafiles are not overwritten.
Download the update/upgrade:- Download and unzip the Update zip file (SoundshaperUD.zip), or Upgrade zip file (SoundshaperUG.zip), as appropriate.
- Copy files from the zip file to your existing CDPR8 folder or Soundshaper folder, as appropriate.
CONFIGURE SOUNDSHAPER
Soundshaper uses a configuration file rather than the Windows Registry.
When starting Soundshaper for the first time, you need to select various essential folders, so that the program can operate correctly.
- Double-click on Soundshaper.exe within your Soundshaper6 folder. You are asked to confirm that you have already installed CDP. Then this dialog appears:

- 1. CDP FOLDER: At the first prompt, select your CDP base folder (e.g. C:\CDPR8).
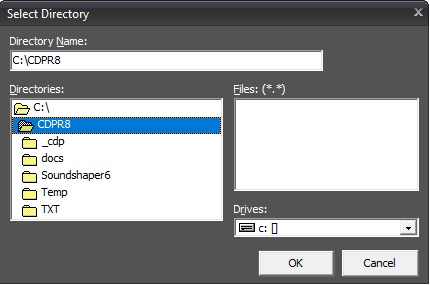
This is a folder selector, which starts in the level above \Soundshaper6. If the folder shown is NOT the one in which you have installed CDP and Soundshaper, then browse to the correct folder and select it.
For Soundshaper to work correctly, it must know where to find the CDP base folder. If you are not sure, close the program and re-start when you can select it successfully.
- 2. CDP PROGRAMS: Soundshaper looks for the CDP programs folder and if it finds it, it will ask you to confirm.
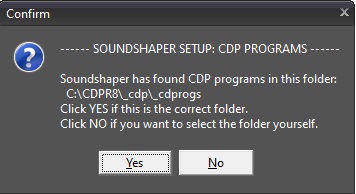
If it cannot find CDP programs, this is probably because you have not selected the correct CDP base folder.
Soundshaper will ask you to close the program and try again.
- 3. OUTPUT FILES: Soundshaper asks you to select or create a TEMPORARY OUTFILES folder for output (sound)files.
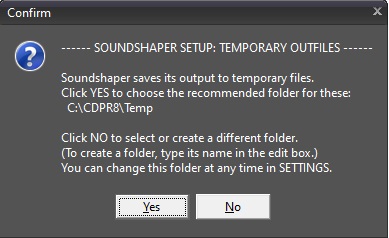
The default for this is <CDP-folder>\TEMP, but it can be a folder on any drive, e.g. E:\TEMP, E:\SOUNDS\TEMP etc. In fact, it is generally a good idea to put sounds on a different drive from Windows, if possible.
This folder path is stored in Soundshaper's Settings and can be edited there, as necessary.
Any name is acceptable, provided the path to the folder has no spaces. Otherwise the CDP programs will not run.
TIP: If you have an SSD drive, use this for maximum speed.
- 4. USER DATA: This folder has already been created and populated as \TXT, in parallel with the folder Soundshaper6, that is, either within the CDP folder or the alternative you chose for extracting Soundshaper.
The prompt asks you to confirm its location and suggests <CDP-folder>\TXT:
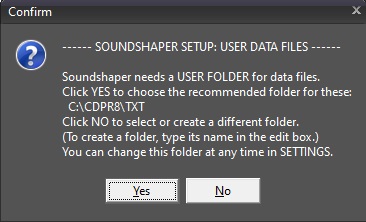
Browse as necessary to the correct folder and confirm. You can rename or relocate this folder later in Settings.
However, note that any supplied updates to datafiles and presets will be set up to install automatically into <CDP-folder>\TXT.
- 5. HELP DOCS: This folder is principally for the CDP documentation, which CDP normally installs in <CDP-folder>\docs. The prompt should reflect this:
This folder can be set later in Settings, if necessary.
You are best to select \docs as the documentation folder, even if you have not yet downloaded the documentation or prefer to access the documentation online.
When you click on a CDP program name within Soundshaper, it links to the online CDP documentation, if you have ticked Option 12 "Online CDP Help", otherwise it uses the stored docs, so it needs to know where these are located.
The Soundshaper manual, when installed, should also be stored within this folder: \docs\Soundshaper.When you have finished, Soundshaper creates a default Settings file Soundshaper.cfg in your Soundshaper6 folder:

THIS COMPLETES THE BASIC INSTALLATION
However, you should now visit Soundshaper's Settings Page – see Options | Settings (F5) – to consider what other settings should be made, and save these to your Settings file.
For details on all Soundshaper Settings, see the supplied file SetupSoundshaper.pdf (in Soundshaper6\docs).Project Folder
You should especially consider setting a current Project Folder. This can be changed at any time and used for quick loading and saving of files.
It is normal to re-set this to whatever project you are currently working on. You may find it more convenient to store project datafiles within your Project Folder (or a subfolder of it), rather than in the User Data folder.
Soundshaper now has its own sound player/viewer, but it also integrates easily with most external audio editors. For example, programs such as Audacity support VST plugins, which unfortunately Soundshaper does not. You can either:
- send the contents of any cell to an external audio program
or- work from the external editor and send some or all of the sound to Soundshaper for processing.
FROM SOUNDSHAPER TO EDITOR AND BACK
- Set a link to your favourite editor in Settings | Settings-tab | Soundfile Viewer.
- Create a dummy cell, following the one you've just processed (Menu: PATCH | Add Null Cell)
- Send the contents of the dummy cell (soundfile only) to the editor by clicking the View Soundfile icon in the toolbar, or hit F2.
Alternatively, you can set up any audio program as a "Favourite" (File | Favorites | Select Favorite Program) and send the current cell's soundfile (only) to the program via Tools | FAVORITES > plus select the external program in the menu.- Process the imported sound in the external editor.
- Export it from the editor (see below), normally to the SAME soundfile name – the NULL cell.
- Continue on to the next process in Soundshaper.
FROM EDITOR TO SOUNDSHAPER AND BACK
IN THE EDITOR:
- Highlight the portion you want to process.
- Export the selection to a file (see below). Leave the selected portion highlighted.
Exporting the selection:
Audacity File > Export Selection Wavosaur File > Export Selection Nero Edit > Copy to File Wavelab File > Save special > Export Selection Wavepad Edit > Save selected region Waveflow File > Export Selection IN SOUNDSHAPER:
- Open the file, e.g. by drag and drop.
- Run the process then save the final cell (should be a soundfile) to a file (click on Save icon).
BACK IN THE EDITOR:
- Open the processed file, select the whole contents (usually CTRL+A) and copy to clipboard (CTRL+C).
- Click on the original file's window (not on the sound-display) and delete the originally selected portion (usually DELETE key or CTRL+DELETE).
- Paste in the processed contents from the clipboard (CTRL+V).
If you don't like the result:
- CTRL+Z: undo the paste operation.
- CTRL+Z: undo the deletion (restore the original).
| Latest Download: SOUNDSHAPER 6.4.1 – freeware. Includes CDP software. |
